Two-Stage Payment
info
Two-stage payment scenarios are only applicable for debit/credit card transactions
Overview
This method is exclusively designed for card-based transactions and not for other payment methods like digital wallets, bank transfers, etc.
In a two-stage payment process, the first stage involves the 'authorization' or the 'blocking' of the payment amount on the customer's card. The second stage is the actual 'capture' or send of funds, which occurs after certain conditions are met (e.g., order approval by admin).
How it works
- Customer Selection: The customer selects products or services from your platform.
- Proceed to Checkout: The customer moves to the checkout page to finalize their order.
- Enter Payment Details: The customer enters their payment details, such as credit card information.
- Authorize Payment: At this point, the payment is authorized, but not yet captured. This means that the funds are temporarily blocked on the customer's account but are not withdrawn.
- Conditional Capture: After certain conditions are met (for example, the order is shipped or a service is confirmed), you can then capture the payment. This is done by making an API call Capture.
- Confirmation: Once the payment is successfully captured, the customer receives a confirmation email or other types of notifications to indicate the completion of the transaction.
Business Cases
- Online Auctions: Funds can be authorized when bids are made and are only captured once the auction is won.
- Service Orders with Confirmation: For services like home repair or bespoke orders, where the final cost is determined after service completion.
- Hotel Bookings: When booking a hotel room online, full payment is typically taken immediately upon reservation.
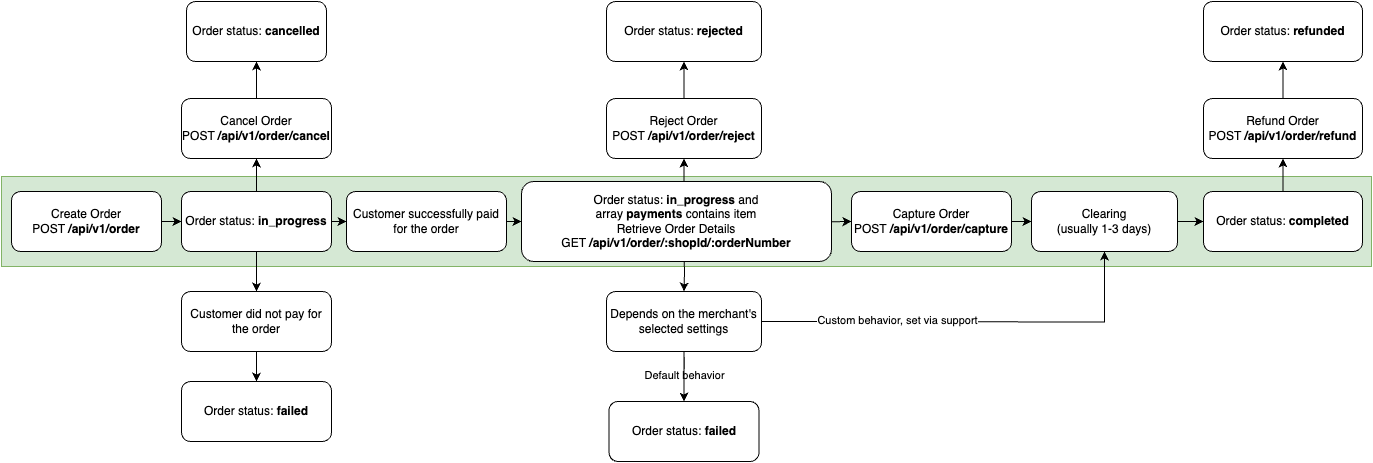
API Call Sequence
To implement the two-stage payment, you'll have to follow a sequence of API calls and operations. Below is a flowchart that depicts the sequence of events in a two-stage payment process.
- Customer Selection: The customer selects products or services from your platform.
- Proceed to Checkout: The customer moves to the checkout page to finalize their order.
- Create Order: Make a POST request to create the new order.
API Calls:
- Create Order with the
autoCaptureparameter set toFalse - Response Handling:
- Success: If you get a 200 OK response, the order is created with an order status:
in_progress. Capture the payment URL (paymentLink) returned in the response.
- Success: If you get a 200 OK response, the order is created with an order status:
- Create Order with the
- Payment Page Display: Present the payment page to the customer using the URL (
paymentLink) obtained from the previous step. - Customer Makes Payment: The customer inputs their payment details and makes the payment on the page to which they were redirected.
- Authorize Payment: At this point, the payment is authorized but not yet captured. The funds are temporarily blocked on the customer's account.
- Order Status Update: After successful payment, the
paymentsarray within the response of the Retrieve Order Details contain payment item. - Query Order Status: You can query the current status of the order by making a call Retrieve Order Details or set up a callback to receive order status updates upon changes.
- API Calls:
- Using Callbacks
- Conditional Capture: Once certain conditions are met (e.g., the order is shipped, or a service is confirmed), capture the payment.
- API Calls:
- API call Capture
- Response Handling:
- Success: The payment is successfully captured, and the order status will update.
- Response Handling:
- API call Capture
- API Calls:
- Confirmation: If you provided the customer's email during the Create Order call, the system would automatically send them a confirmation email. If the email was not provided, you would need to send the confirmation email manually.
- Clearing Process: Wait for 1-3 days for the clearing process to be completed.
- Order Completion: After the clearing process, the order status will change to
completed.
Order Life Cycle
Settings
- To enable two-stage payment scenarios in the Create Order Endpoint, the
autoCaptureparameter must be explicitly set toFalse.